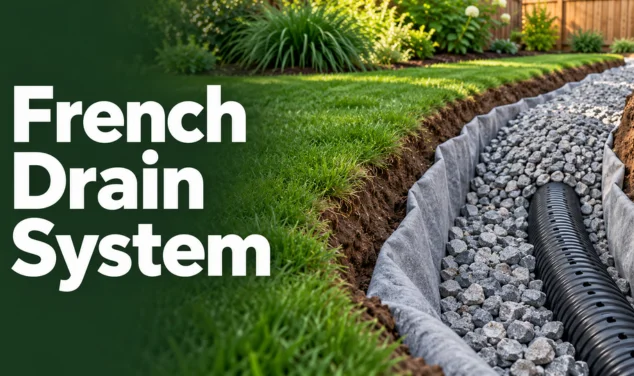

A French drain system gives excess groundwater an easier path away from wet areas. It uses gravel, filter fabric, and usually perforated pipe to collect water below ground. Homeowners commonly use one for soggy yards, foundation moisture, and recurring water near low spots. Most outdoor systems work without a pump. Gravity carries collected water toward a safe outlet at a lower elevation.
Good planning matters because a drain without proper slope or discharge can move the problem elsewhere.
| Planning point | Practical guidance |
|---|---|
| Main purpose | Collect and redirect excess surface or subsurface water. |
| Common locations | Wet yards, slopes, foundations, retaining walls |
| Main components | Trench, filter fabric, washed stone, perforated pipe |
| Typical outlet | Daylight outlet, dry well, approved drainage connection |
| Typical U.S. professional cost | Roughly $500 to $18,000 depending on scope and site conditions |
| DIY difficulty | Moderate to difficult |
| Safety step | Contact 811 before excavation. |
| Main failure risks | Poor slope, clogged fabric, bad outlet, undersized design |
Key takeaways
- A subsurface drain works best when water is moving through saturated soil.
- The pipe needs positive fall toward a suitable discharge location.
- Filter fabric and clean stone help slow sediment buildup.
- Surface grading and gutters should also move water away from the house.
- U.S. homeowners should contact 811 before excavation.
- Local rules can limit where collected water may discharge.
What is a French drain?
A French drain is a gravel-filled trench that collects and redirects unwanted water. Most modern versions contain perforated drainage pipe surrounded by washed stone. Permeable fabric separates the stone from nearby soil and helps reduce sediment entry.
Direct answer: A French drain collects water in a gravel-filled trench and directs it through perforated pipe toward a lower outlet. It is useful for wet lawns, groundwater near foundations, and saturated slopes. Proper slope, filter fabric, clean stone, and a legal discharge point determine whether the installation performs well.
The concept is simple, but the site controls whether it succeeds. Water needs a lower, safer place to go after entering the trench. A blocked or poorly located outlet can leave the trench full after storms.
How a French Drain System Works
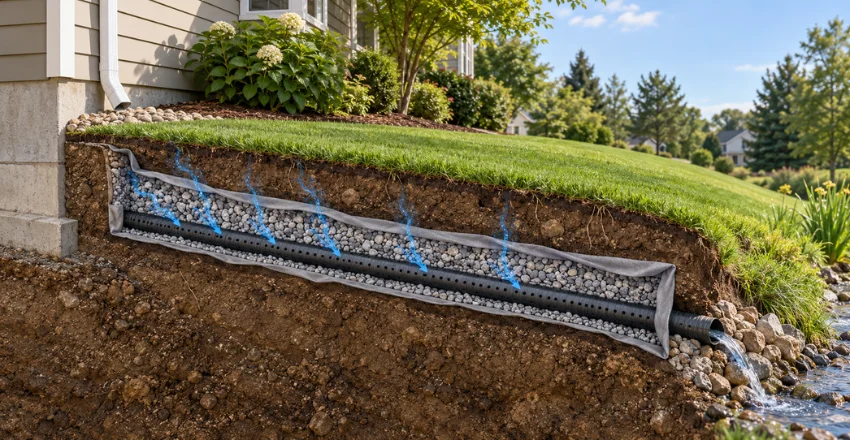
A French drain system creates a path with less resistance than compacted surrounding soil. Water filters through the stone and reaches openings in the buried pipe. The sloped pipe then carries that water toward the selected outlet. The drain does not suck moisture from the entire property. It intercepts water that reaches the trench or moves through the nearby soil. Placement should therefore follow the actual drainage path.
A proper outlet is as important as the trench itself. Possible outlets include a lower part of the property or an approved dry well. Some locations may also permit connections to designated stormwater infrastructure.
When does this type of drainage make sense?
A subsurface drain can help when part of a lawn stays saturated long after rainfall ends. It may also intercept groundwater moving downhill toward a house. Persistent muddy strips and seepage near below-grade walls can also indicate a drainage problem. Not every puddle requires underground drainage. First check downspouts, gutters, soil grading, irrigation, and obvious surface runoff. Correcting those problems may cost less and disturb less of the yard.
Water near the house deserves prompt attention because repeated moisture can affect building materials. A Home Guru’s guidance on preventing water-leak damage explains other moisture sources homeowners should inspect. Drainage should address the cause instead of hiding the visible symptom.
What materials are used?
Most residential installations use perforated pipe, washed drainage stone, and nonwoven filter fabric. Pipe diameter and material depend on expected water volume and the project design. A solid pipe is often useful after the collection area when water only needs to be transported. Washed aggregate leaves open spaces for water to move toward the pipe.
Stone containing excessive fines can reduce those spaces over time. Fabric helps separate the drainage stone from surrounding soil. Some projects also need fittings, catch basins, cleanouts, or outlet protection. Those additions depend on site conditions rather than a universal parts list. Retaining walls and foundation projects can require more specialized design.
How to plan installation safely
Start by identifying where water appears and where it can legally leave the property. When possible, watch the area during or soon after substantial rainfall. Mark high points, low points, downspouts, slopes, structures, and likely underground utilities. U.S. homeowners should contact 811 before excavation begins. The U.S. Department of Transportation identifies 811 as the nationwide system for arranging underground utility markings.
State requirements determine how far ahead you must make the request. You should also check local rules before choosing an outlet. Do not intentionally send collected runoff onto neighboring property or create erosion downstream. Municipal requirements can differ significantly between locations.
Basic installation steps
An experienced DIY homeowner may manage a small yard project. Large foundation projects are far less forgiving because excavation and waterproofing errors can become expensive. Confirm utilities, drainage direction, and soil conditions before disturbing the site.
- Locate the water problem. Identify where water enters, collects, or crosses the property.
- Choose a safe outlet. Select a lower discharge location that follows local requirements.
- Mark the route. Plan the shortest practical path with continuous positive drainage.
- Contact 811. Have affected underground utilities marked before excavation.
- Excavate the trench. Maintain the required depth and a consistent downward route.
- Install filter fabric. Leave enough material to separate surrounding soil from the stone.
- Add clean drainage stone. Create a stable bed that allows water to move freely.
- Place the perforated pipe. Follow the pipe manufacturer’s installation instructions and planned slope.
- Cover with more stone. Maintain open drainage space around the collection pipe.
- Close the fabric. Separate the drainage aggregate from backfill or topsoil.
- Finish the surface. Restore the lawn or create a decorative stone strip where appropriate.
- Test the outlet. Confirm water can travel through the route without backing up.
Home Depot’s installation guidance also stresses downhill drainage and choosing a defined outlet. Its guide recommends confirming zoning restrictions and permissions before installation.
How much does installation cost in the U.S.?
Project costs vary because a shallow lawn trench differs greatly from foundation excavation. Angi’s 2026 data places reported projects across a broad range of roughly $500 to $18,000. Yard drainage systems generally range from $2,200 to $6,800. Access, trench depth, total length, soil, landscaping, and disposal requirements affect the final price. Foundation work can add excavation, waterproofing, pumps, concrete repairs, and interior finishing.
Get itemized estimates when professional installation is needed. DIY work can reduce labor costs but does not remove design risks. Renting excavation equipment also adds cost and requires safe access. A poorly built drain can become more expensive after landscaping must be opened twice.
| Project condition | Cost effect | Why |
|---|---|---|
| Short, shallow yard route | Lower | Less excavation and material |
| Long run | Higher | More pipe, stone, fabric, and labor |
| Heavy clay or rocky soil | Higher | Excavation is slower. |
| Restricted equipment access | Higher | More hand labor may be required. |
| Foundation installation | Much higher | Deeper excavation and waterproofing |
| Complex discharge solution | Higher | May need dry wells or other components |
Yard drains and foundation water are different problems.
A wet lawn often needs interception before water reaches a low area. Foundation moisture may require grading, gutter corrections, waterproofing, or perimeter drainage. The correct solution depends on where the water originates. Basement problems should therefore receive a broader moisture assessment. A Home Guru’s Basements section covers related below-grade home issues.
Egress wells also need reliable drainage because they can collect substantial rainwater. For that situation, review the site’s egress window and area-well guidance before modifying a basement opening. Window wells, foundation drainage, and grading should work together. Fixing only one part can leave another route for water.
Common installation mistakes
The first mistake is building a trench before deciding where the water will discharge. A drain that ends in another saturated location has limited value. Include the outlet in the design from the start. Another mistake is ignoring soil contamination of the stone. Fine soil can migrate into drainage voids and reduce water movement. Suitable filter fabric helps separate the aggregate from nearby earth.
Poor slope can also leave sections holding water. Use careful elevation measurements rather than judging grade by sight. Long installations may require a laser level or other accurate measuring method. Tree placement also matters because roots can complicate excavation and future maintenance. Large roots should not be cut casually near mature trees.
A Home Guru’s advice on how far to plant trees from your house explains why mature root spread deserves planning.
Maintenance and warning signs
A well-built system needs less attention than an exposed channel, but it isn’t maintenance-free. Keep visible outlets clear of leaves, mulch, soil, and vegetation. Inspect them after major storms and seasonal yard work. Watch for water returning to locations that previously stayed dry. New surface settlement above the trench can also indicate soil movement.
Slow discharge may point to blockage, damage, or an outlet problem. Changes elsewhere on the property can affect performance. New patios, additions, neighboring grading, and downspout changes may redirect runoff. Reassess the whole drainage pattern when moisture problems suddenly return.
DIY or professional installation?
A straightforward yard trench may suit homeowners comfortable with excavation and grade measurements. You still need a known outlet, utility markings, and a workable route. Only use rental equipment if you’re familiar with safe operation. Professional help makes more sense near foundations, retaining walls, septic areas, steep slopes, or major utilities. It is also sensible when the property has no obvious discharge point.
A drainage contractor can assess elevation, soil, flow paths, and local requirements together. Ask contractors to explain exactly where collected water will go. The proposal should also identify pipe, stone, fabric, cleanouts, and surface restoration. Clear scope makes competing bids easier to compare.
Frequently asked questions
How deep should a French drain be?
Depth depends on the water source and what the drain needs to intercept. A shallow yard problem may need less excavation than a foundation drainage project. Site elevation and outlet depth can also limit the design.
Does a French drain need a perforated pipe?
Traditional designs can use gravel without pipe, but modern residential projects often include perforated pipe. The pipe provides a defined channel for collected water to travel. Gravel alone usually moves water more slowly over long distances.
How much slope does the pipe need?
The route needs enough continuous fall to keep water moving toward the outlet. Many homeowner guides use about one percent as a practical planning target. Actual requirements should match the site, pipe, flow, and local practices.
Can it empty into the street?
That depends on local stormwater and drainage rules. Some jurisdictions restrict curb or storm-system connections and require approval. Check with your city, county, or drainage authority before connecting anything.
How long can a properly installed drain last?
Service life depends on materials, soil, sediment control, root intrusion, and outlet maintenance. Bob Vila reports that a properly installed system can last more than 20 years. Poor filtration or a blocked outlet can shorten that lifespan.
Plan the water’s destination before digging
Good drainage starts by understanding where the water comes from and where it should go. Surface grading, gutters, soil conditions, and underground flow should be considered together. Digging a trench without that diagnosis can waste both labor and money. For a small yard problem, map the route and verify a safe outlet before purchasing materials.
Contact 811 and check your local discharge requirements before excavation. For foundation or complex drainage problems, have a qualified professional evaluate the property first.